Real-Time Monitoring with a Dynamic Web Dashboard
Motivation
This project creates a comprehensive environmental monitoring system using a Raspberry Pi. It integrates various hardware and software components to collect, display, and manage environmental data.
Key Components:
- Hardware Integration:
- BMP280 sensor for environmental data collection
- Push button for safe system shutdown
- Software Development:
- Python scripts for sensor communication and data processing
- Flask web server for data presentation
- System service for automatic startup and shutdown handling
Core Functionalities:
- Data Collection:
- Utilizes I2C communication to gather temperature, pressure, and humidity data from the BMP280 sensor
- Data Presentation:
- Displays real-time environmental data through a web interface
- System Management:
- Implements a safe shutdown mechanism using a physical button
Technical Aspects Covered:
- I2C protocol for sensor communication
- Web server setup and configuration
- Python programming for data handling and system control
- Linux system services for process management
- Hardware interfacing with Raspberry Pi GPIO
This project serves as a practical example of integrating various technologies to create a functional IoT device for environmental monitoring.
PS: The setup for the crontab and a few minor steps have been intentionally omitted. This is an opportunity for you to explore and piece everything together on your own. Enjoy the process, and happy coding! 😊
Hardware Setup
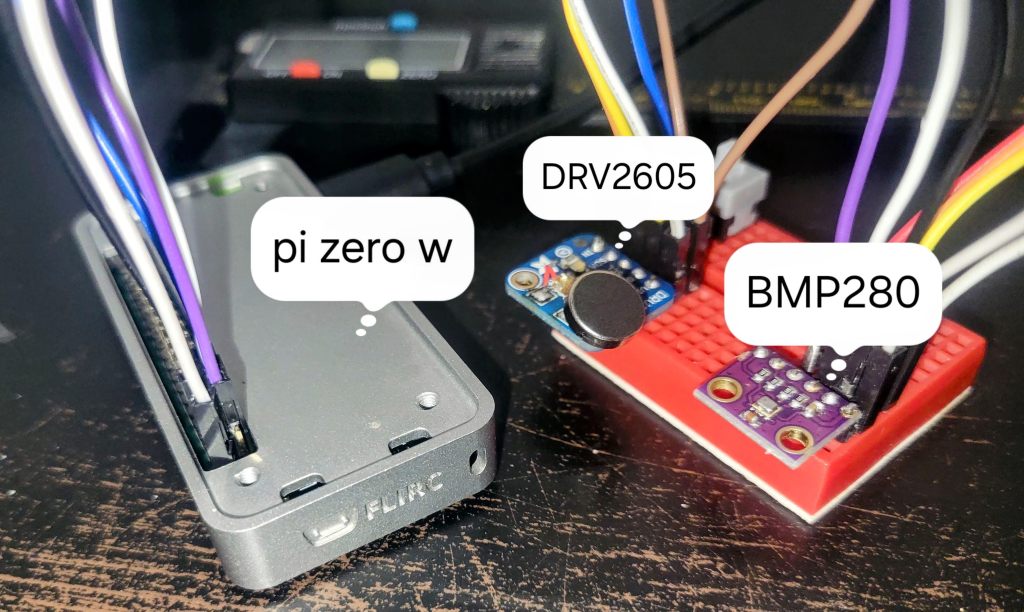
Raspberry Pi Zero
- Processor: Single-core
- Memory: 512MB RAM
- Operating System: DietPi (lightweight, optimized for minimal hardware)
Connected Devices
- SPST Switch
- Function: Safely shuts down the Raspberry Pi when pressed.
- Connection: GPIO 4 (Pin 7).
- BMP280 Sensor
- Function: Measures temperature and pressure.
- Interface: I2C (connected to SDA and SCL pins).
- DRV2605L Haptic Driver
- Function: Controls a haptic motor to provide feedback on specific actions (e.g., shutdown).
- Interface: I2C.
Software Setup
Operating System
- DietPi: A lightweight Debian-based OS optimized for single-board computers like the Raspberry Pi Zero.
Webserver Stack
- Web Server: Lighttpd
- Database: SQLite3
- Scripting Language: PHP
Python Packages
To interact with the hardware, the following Python packages are used:
adafruit-circuitpython-bmp280adafruit-circuitpython-drv2605RPi.GPIOsqlite3
pip install adafruit-circuitpython-bmp280 adafruit-circuitpython-drv2605 RPi.GPIO sqlite3
Code
Codebase
The full codebase can be accessed at: Project Codebase
Python Scripts
- WeatherSensor.py
- Function: Reads temperature and pressure data from the BMP280 sensor and stores the readings in an SQLite database.
- Location:
/root/python-scripts/ - Execution: This script can be scheduled to run periodically using cron.
- Shutdown.py
- Function: Monitors the state of the SPST switch. When pressed, it triggers a vibration (via DRV2605L) and safely shuts down the Raspberry Pi.
- Location:
/root/python-scripts/
- cleanup.py
- Function: Deletes old records (older than 300 days) from the SQLite database to manage storage space.
- Location:
/root/python-scripts/
PHP Files
- fetch_data.php
- Function: Retrieves the latest temperature and pressure data from the SQLite database.
- Usage: This script is called by
LocalWeather.phpto get data.
- LocalWeather.php
- Function: Displays a chart of temperature and air pressure data retrieved via
fetch_data.php. - Usage: This file is served by the web server and provides a user-friendly interface to view the data. Uses AJAX to dynamically update the Chart element.
- Function: Displays a chart of temperature and air pressure data retrieved via

Database Setup
SQLite3 Database
- Location:
/home/dietpi/sensor_data.db - Tables:
sensor_readings: Stores temperature, pressure, and timestamp of each reading.
The database is initialized and managed by the Python scripts (WeatherSensor.py for inserting data, cleanup.py for managing old records).
Conclusion
This project served as a practical refresher on coding and hardware integration, reinforcing skills in Python programming, database management, and hardware interaction using a Raspberry Pi. The next phase involves connecting the BMP280 to an ESP32 and setting up an MQTT server. The MQTT server and web server can both be hosted on the Raspberry Pi, with the ESP32 handling data collection. This setup offers several advantages:
- Low Power Consumption: ESP32’s deep sleep mode and battery operation.
- Improved Reliability: Reduced overhead compared to a full Linux environment.
- Modularity: The ability to upgrade components like the MQTT server or web page without disrupting data collection.
PS: Please note that the crontab setup and a few trivial steps have been deliberately left out 🙂 THat’s your you to figure out and make it work. Hppy coding!
